

Stop shrinkage by combining tight cycle control (stable deep vacuum plus a slow secondary drying ramp) with fast, high-barrier packaging. Skip any one of these, and you’re rolling dice on every batch.
TL;DR:
- Maintaining a chamber pressure below 150 mTorr during primary drying is crucial; fluctuations can cause uneven shrinkage and structural collapse.
- Using a secondary drying ramp of 5 to 10°F per hour prevents pushing the product temperature above its glass transition point, avoiding collapse-related shrinkage.
- Packaging to dried volume with 20 to 25% headspace and properly sized desiccants significantly reduces reabsorption and post-drying shrinkage.
- Running dedicated cycles for different product types, such as gummies and hard candies, prevents uneven drying that can lead to shrinkage or stickiness.
- Consistent calibration, pre-kitting, and timely transfer into sealed, moisture-protective pouches are key habits that keep shrinkage rates low across batches.
Table of Contents
- How Do You Stop Shrinkage in Freeze-Dried Candy?
- Freeze-Drying Cycle Controls That Reduce Structural Collapse
- Loading and Handling Rules That Protect Finished Volume
- Packaging Specs and Storage That Stop Post-Dry Shrinkage
- Quality Checks and Troubleshooting That Catch Shrinkage Early
- Why “Shrinkage” Happens and Which Products Are Most Prone
- Which Formulation Choices Help Reduce Product Shrinkage
- Techniques for Sealing In Moisture Control Before Drying Begins
- Styling the Cycle: Adjusting Ramps and Timing for Different Product Types
- Daily Production Habits That Keep Shrinkage Rates Low
- Common Mistakes That Quietly Worsen Shrinkage
- What We Learned Running Freeze-Dry Cycles at Scale
- Let Space-man Handle the Freeze-Drying and Packaging for You
- Sources
- FAQ
How Do You Stop Shrinkage in Freeze-Dried Candy?
Shrinkage in freeze-dried candy almost always traces back to one of three failure points: the drying cycle itself, how product got loaded and handled, or how fast (and how well) it got packaged after drying. Fix all three and you fix shrinkage. Fix only one and you’ll keep chasing the same complaint from retail buyers about “flat” or “shriveled” batches.
Here’s the checklist we hand new operators on the floor, in the order they should actually happen.
- Verify vacuum system health before loading. Check pump oil, gasket seals, and pressure gauge calibration. A pump that’s slowly losing draw is the single most common hidden cause of soft, collapsed batches.
- Condition product in-chamber for 30 to 60 minutes before starting the drop to full vacuum. This avoids thermal shock that fractures delicate structures like marshmallow and gummy shells.
- Pre-stage everything you’ll need to pack — pouches sized correctly, pre-measured desiccant or oxygen absorber packets, and a vacuum sealer that’s already warmed up and tested.
- Run separate batches by product type and size. Hard candies, gummies, and marshmallows behave differently under vacuum and should never share a tray.
- Load in a single layer with visible spacing between pieces. Crowded or stacked trays dry unevenly and crush easily on unload.
- Seal within about 5 minutes of opening the chamber door. Every minute product sits exposed to ambient humidity is a minute it’s pulling moisture back in.
Practical operator logs back this up directly: one documented batch record showed sticky, collapsed product rates drop from 38% to 4% once teams adopted in-chamber conditioning and a 5-minute seal window.
Pro Tip: Pre-kit your desiccant packets and pouches into batch-sized bundles the day before a run. It sounds small, but it’s the difference between a calm 5-minute seal and a scramble that turns into 15.
Freeze-Drying Cycle Controls That Reduce Structural Collapse
Everything starts with freezing. The rate at which product freezes determines the size and shape of the ice crystals inside it, and those crystals are what leave behind the pore structure once they sublimate. Freeze too slowly and you get large, uneven ice crystals that leave a coarse, collapse-prone matrix. Freeze fast and consistently, and you lock in a finer, more stable structure that holds its shape through drying.
Primary drying is where most shrinkage risk gets decided. You want a stable pull-down to a deep vacuum, generally under 150 mTorr, held consistently rather than fluctuating. Pressure swings mid-cycle are often a sign of a slow leak or a pump losing efficiency, and they show up later as soft spots or partial collapse in the finished product. That 150 mTorr target, paired with a final moisture goal of 1 to 2%, is a reasonable benchmark for most confectionery loads, though dense or high-sugar items may need adjustment.
Secondary drying is where impatience does the most damage. Bumping shelf temperature up to shorten cycle time feels efficient, but it risks pushing product temperature above its glass transition point, or Tg, the threshold where the dried matrix softens and loses its rigid, porous structure. A review of drying and shrinkage mechanics confirms that staying below Tg during drying is what preserves pore structure and keeps shrinkage in check. A ramp of 5 to 10°F per hour, rather than jumping straight to a high shelf temperature, gives moisture time to leave without collapsing the scaffold behind it.
If a batch comes out under-dried or slightly tacky, a short reconditioning cycle at low heat and deep vacuum is usually enough to correct it. Whatever settings you run, log them. Shrinkage and porosity outcomes vary by composition and process parameters, so a cycle tuned for gummy bears won’t necessarily work for marshmallow bites, and you’ll want the record to know why.
Loading and Handling Rules That Protect Finished Volume
Never run high-moisture items like gummies in the same cycle as low-moisture hard candies. Their moisture release curves are completely different, and mixing them almost guarantees uneven drying, sticky pockets on one side of the tray, and partial collapse on the other. Run dedicated cycles by product family, full stop.
Beyond that, loading discipline is mostly about giving product room to behave predictably:
- Place pieces in a single layer with visible gaps between them, never stacked or touching edge to edge.
- Pre-freeze fragile items like marshmallows and mousse-based pieces before they go under vacuum, so their structure is stable before drying starts.
- Size your loading and eventual packaging around expected expansion volume, not the wet weight going in. A gummy that looks small wet can occupy considerably more visual space once dried.
- Use parchment or fine mesh liners to keep pieces from sticking to trays, while still allowing airflow underneath.
- Budget for roughly 20 to 25% headspace when you get to packaging, since sizing bags for wet weight is one of the most common reasons finished pouches look crushed on a shelf.
Handling after unload matters just as much as handling before. Freeze-dried candy is at its most fragile in the first few minutes out of the chamber, before it’s had any chance to rehydrate slightly at the surface. Rough transfers, dropped trays, or piling product into a bin before packaging is exactly how you turn a technically perfect dry cycle into a bag of broken pieces and shrinkage complaints from a retail buyer.
Packaging Specs and Storage That Stop Post-Dry Shrinkage
Packaging isn’t cleanup after the real work is done. It’s the last mile of the drying process, and treating it that way changes how fast and how carefully teams move.
The standard for barrier film is a laminated structure combining PET, aluminum, and polyethylene, often marketed as high-barrier Mylar. Industry sizing guides recommend this 3-layer PET/AL/PE stack as the baseline for long-term moisture and oxygen protection, and it’s a solid default whether you’re bagging for retail or bulk. Our own breakdown of plastic packaging types for freeze-dried candy covers the tradeoffs in more depth if you’re comparing pouch formats for a new product line.
Here’s what to lock in before your first production run:
- Bag sizing: size to the product’s visual (dried) volume, not its wet weight, and leave 20 to 25% headspace so pieces aren’t crushed against the seal.
- Desiccant or oxygen absorber sizing: match the sachet to your headspace volume and the product’s moisture avidity, not a generic one-size packet. Properly sized, food-contact-approved desiccants paired with a high-barrier pouch are what keep texture stable for months rather than weeks.
- Seal integrity checks: verify heat-seal temperature and dwell time against your film spec, and run random pull tests or leak checks on a sample from every shift.
- QC indicators: drop a humidity indicator card into sample pouches so a spot check tells you instantly if a seal has failed.
- Storage conditions: hold finished inventory at relative humidity under 30%, in a cool space between roughly 50 and 65°F.
The math that matters: a pouch sized correctly with 20 to 25% headspace and a matched desiccant load is doing more to prevent shrinkage after the fact than almost any packaging tweak you could make later. Get the sizing wrong and no film stack saves you.
Prompt transfer into that sealed environment is what actually locks in the win from a good drying cycle. A properly sized desiccant in the right barrier pouch prevents the rapid reabsorption that turns a perfectly dried batch soft again within days. For guidance on shelf handling once product is boxed and shipped, our storage guide for freeze-dried candy walks through the downstream side of this.
Quality Checks and Troubleshooting That Catch Shrinkage Early
Every batch needs a log, and a useful one is short enough that operators will actually fill it out. At minimum, record: product SKU, tray layout, pre-freeze temperature, shelf temperature profile, chamber pressure timeline, final residual moisture, time-to-seal, and packaging kit ID. That last one matters more than people expect. When a customer calls about a soft bag six weeks later, the kit ID tells you instantly whether it was a packaging batch issue or a drying issue.
For fast diagnostics, run three checks regularly:
- Spot-check moisture on a sample from each batch, aiming for that 1 to 2% target range.
- Drop humidity indicator cards into a handful of sealed pouches per run and check them at random intervals.
- Open-pack inspections on a small sample before shipping, looking specifically for stickiness, partial collapse, or uneven texture across pieces.
If you’re seeing sticky or collapsed product, the fix is usually one of four things: a vacuum leak, mixed product types in one cycle, too fast a secondary ramp, or a seal that didn’t hold. Repackage or recondition affected batches rather than shipping them, and note the fix in your log so the next run doesn’t repeat it. Our piece on common packaging failure modes walks through several of these in more detail if you’re troubleshooting a recurring issue.
Why “Shrinkage” Happens and Which Products Are Most Prone
Shrinkage is what happens when a food product loses volume, structure, or weight beyond what’s expected during freeze-drying or packaging. It’s the gap between what you loaded into the chamber and what actually lands on a retail shelf looking full-size and intact.
The root cause is almost always tied to how moisture leaves the product and how the resulting pore structure holds up under vacuum and heat. When ice sublimates too fast, or when a product’s temperature creeps above its glass transition point during drying, the internal scaffold that ice crystals left behind collapses in on itself. What comes out of the chamber looks smaller and denser than what went in, even though the actual mass loss (moisture) was the same as a well-run batch.
Some product types are simply more prone to this than others. Gummies and marshmallows, with their high sugar and moisture content, are among the most sensitive because their structure depends heavily on trapped water for shape. Hard candies tend to be more forgiving structurally but are more sensitive to cracking if freezing rates aren’t controlled. Chocolate and dairy-based items sit somewhere in between, prone less to visible collapse and more to texture changes if temperature isn’t managed carefully through the cycle.
Scientific reviews on drying mechanics point to composition, drying temperature, and processing parameters as the dominant variables. That’s a technical way of saying there’s no universal setting that works for every candy type. A cycle dialed in for one product family will very likely produce shrinkage in a different one.
Which Formulation Choices Help Reduce Product Shrinkage
Formulation is where a lot of shrinkage risk gets baked in long before a batch ever sees a vacuum chamber. Sugar content, moisture percentage, and the presence of stabilizing ingredients like gelatin or pectin all affect how well a product’s structure holds up once water starts leaving.
Products with a more even, controlled moisture distribution going in tend to dry more predictably. That’s part of why hard candies, which are dense and low in free moisture, generally shrink less than moisture-heavy gummies or marshmallows. If you’re formulating a new SKU specifically for freeze-drying, testing a slightly lower initial moisture content or a formulation with better structural stabilizers can meaningfully reduce collapse risk before you even touch cycle settings.
For co-pack clients bringing in a formula that wasn’t originally designed with freeze-drying in mind, this is often the first conversation worth having. A recipe that works fine for conventional shelf storage doesn’t always translate cleanly into a freeze-dry cycle, and small formulation tweaks (adjusting sugar ratios, reducing free water, adding a stabilizer) can do more to protect finished volume than any amount of cycle tuning downstream.
The takeaway for procurement and product teams: shrinkage isn’t purely a manufacturing problem to solve after the fact. It’s worth flagging formulation risk during product development, especially for high-moisture confectionery categories, rather than discovering it after a full production run comes out looking half the size it should.
Techniques for Sealing In Moisture Control Before Drying Begins
Sealing, in this context, means controlling how and when moisture leaves the product, rather than letting it escape unevenly or too fast. That control starts at pre-freezing, where the goal is a fast, even freeze that locks in a fine ice crystal structure rather than the coarse crystals a slow freeze produces.
Pre-freezing fragile items separately, before they go into the main freeze-drying cycle, gives delicate structures like marshmallow or mousse-based candy a chance to stabilize before vacuum is applied. Skip this step and you risk fracturing or partial collapse the moment pressure drops.
During primary drying, the “sealing” comes from a stable, deep vacuum. Fluctuating pressure lets moisture re-condense on product surfaces intermittently, which creates the uneven texture that often gets mistaken for a drying-time problem when it’s really a vacuum-stability problem. Keeping that pressure steady and below the 150 mTorr benchmark is what actually locks moisture removal into a predictable, even path.
The final seal, of course, is the one that happens after drying: transferring product into a barrier pouch fast enough that it doesn’t have time to pull ambient humidity back into the structure it just spent hours losing. This is the step most operations underestimate, treating packaging as a separate task from drying rather than its direct continuation.
Styling the Cycle: Adjusting Ramps and Timing for Different Product Types
Just as a hairstylist adjusts technique for different textures, production teams need distinct cycle “styles” for different candy types rather than running one default program across everything. Gummies generally need a longer, gentler secondary ramp to avoid pushing past their glass transition point given their higher sugar content. Hard candies can typically tolerate a slightly steeper ramp since their structure is denser and less prone to collapse. Marshmallows sit at the sensitive end, needing both a careful pre-freeze and the slowest secondary ramp of the group.
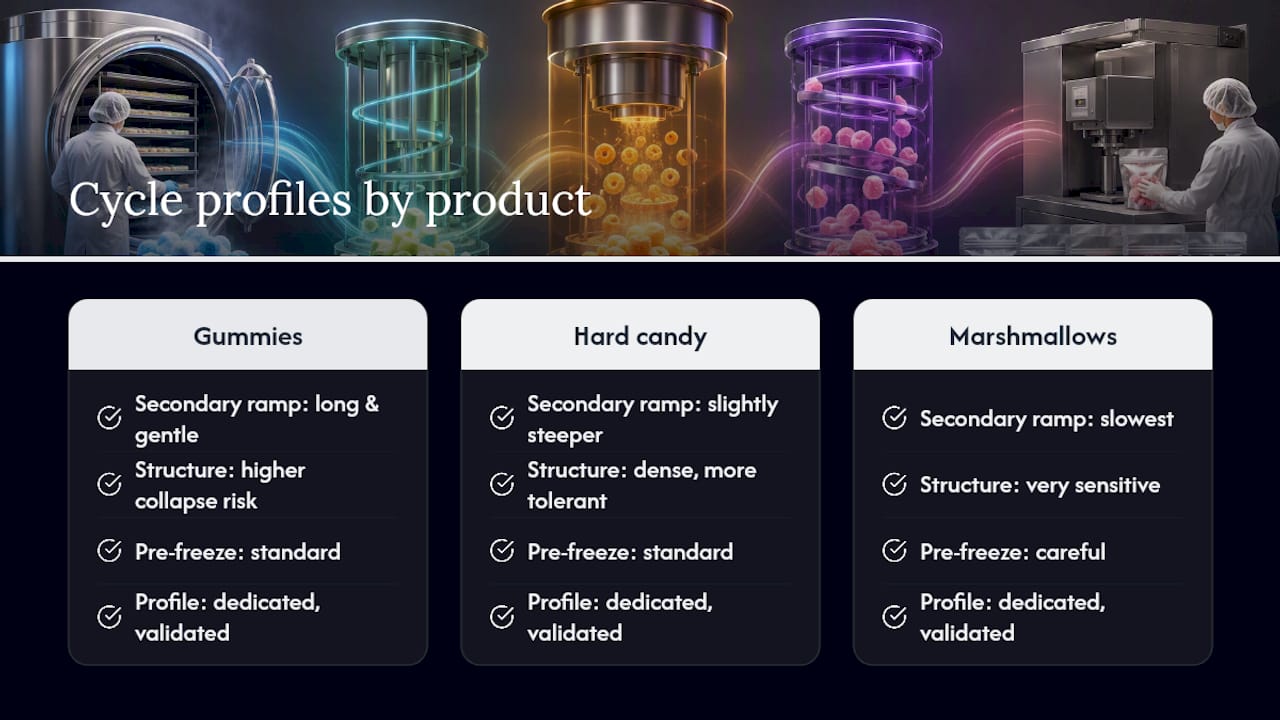
Blending product types into one cycle “profile” almost never works. Teams that try to standardize a single ramp schedule across their whole product line usually end up over-drying their hardiest SKU while under-drying (or collapsing) their most delicate one. The fix is building two or three validated cycle profiles, one per product family, and sticking to them rather than eyeballing adjustments run to run.
Documenting each profile’s ramp rate, target pressure, and hold times means a new operator can reproduce a good result without guessing. That consistency is what separates a shop that occasionally nails a batch from one that reliably does.
Daily Production Habits That Keep Shrinkage Rates Low
Consistency day to day matters more than any single heroic fix. Shops that keep shrinkage rates low tend to share a few habits that have nothing to do with fancy equipment and everything to do with discipline.
Calibrate your vacuum gauge and check pump oil on a set schedule rather than waiting for a problem to show up in finished product. Keep a running log of every cycle’s parameters, even on days when nothing seems wrong, since the value of a log is comparing today’s numbers against last month’s when something eventually does go sideways. Pre-kit packaging materials daily instead of scrambling once product is already out of the chamber and losing time to ambient air.
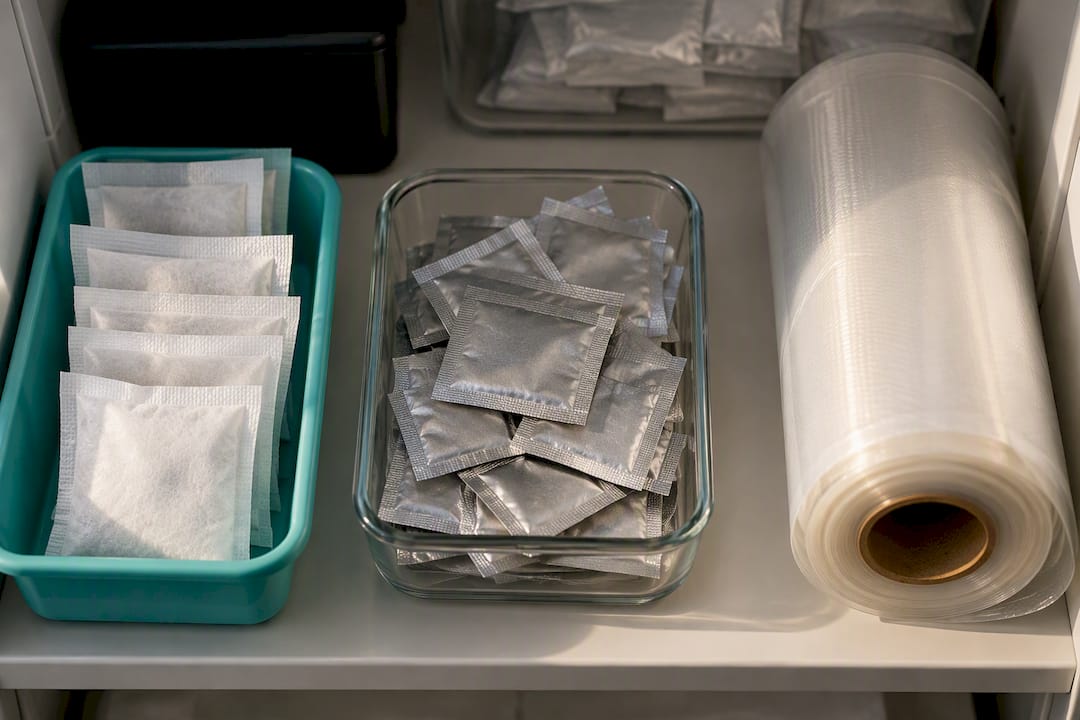
Rotate desiccant and oxygen absorber stock so nothing sits open or partially exposed to humidity before it’s used, and store bulk packaging film in a dry area away from loading docks or anywhere humidity swings are common. None of this is complicated. It’s just the kind of unglamorous routine that separates a shop with a 4% defect rate from one stuck at 30%.
Common Mistakes That Quietly Worsen Shrinkage
The single most common mistake is rushing secondary drying by cranking shelf heat to shave time off a cycle. It feels efficient in the moment, but pushing product temperature past its glass transition threshold forces exactly the kind of structural collapse this entire process is designed to avoid. Patience during that ramp phase is not optional if you care about finished volume.
Mixing product types in one cycle is a close second. Moisture release dynamics between a gummy and a hard candy are different enough that running them together almost guarantees uneven results, usually sticky spots on one product and slight over-drying on the other.
Delayed sealing rounds out the top three. Every minute a dried batch sits exposed after the chamber opens is a minute it’s reabsorbing ambient moisture, quietly undoing the structural win the drying cycle just achieved. Teams that treat packaging as a leisurely follow-up step, rather than a race against ambient humidity, are the ones who end up with the most customer complaints about texture.
Smaller but still costly mistakes include sizing pouches to wet weight instead of dried volume, skipping pre-freeze on fragile items, and letting vacuum pump maintenance slide until pressure readings start drifting. None of these are dramatic failures on their own. Stacked together across a production week, they’re exactly how a shop ends up with a shrinkage complaint rate that never quite goes away.
What We Learned Running Freeze-Dry Cycles at Scale
Treat sealing as a continuation of the vacuum, not a separate department. The biggest single improvement most shops can make is synchronizing packaging stations to dryer unloads, so a batch never sits exposed waiting for someone to notice it’s ready.
Pre-kitting pouches with desiccant and absorber the day before a run shaves real seconds off that critical seal window, and seconds matter here. On logs, we mandate three fields every shift: chamber pressure timeline, final moisture reading, and time-to-seal. Skip those and you’re troubleshooting blind. The honest tradeoff is speed versus structural integrity, and every shop that’s tried to win both at once has learned which one actually holds up on a shelf.
— Chadi
Let Space-man Handle the Freeze-Drying and Packaging for You
If you’d rather skip the trial-and-error of tuning cycle parameters and packaging specs in-house, professional co-packing and private label services are available that handle this process daily. Handling drying and packaging under one roof eliminates the gap between chamber and pouch where moisture can creep back in, which is a common source of shrinkage complaints.

Such services can include commercial freeze-drying, dry food co-packing, pouch packaging, and full private label runs, allowing customers to consolidate multiple production steps under one contract instead of managing several vendors. Brands managing formulation risk on high-moisture confectionery, or co-pack clients with shrinkage-driven returns, can benefit from facilities specifically tuned to address these challenges. Browse our freeze-dried candy and treats lineup to see finished product quality firsthand, or reach out through our private label and co-packing services page to request a packaging specification consultation or set up a pilot run before committing to full volume.
Sources
- Freeze-Dried Candy Packaging: Mylar Bags, Sizing & Brand Guide – Made 2 Order Merch
- Review article on drying, shrinkage, and glass transition mechanisms (2018)
- How To Make Freeze-Dried Candy: Recipes, Tips, And Troubleshooting
- Effect of freeze-drying conditions on shrinkage and porosity of dehydrated agricultural products (MDPI, 2020)
- Desiccant for freeze-dried candy snacks — AtmosisScience (2026)
FAQ
What Vacuum Level Prevents Shrinkage in Freeze-Dried Candy?
Most freeze-dried candy needs chamber pressure held below 150 mTorr during primary drying to avoid structural collapse. Stability matters as much as depth. Fluctuating pressure mid-cycle causes uneven drying even when the average reading looks fine.
How Fast Should Secondary Drying Ramp Up?
A ramp of 5 to 10°F per hour is the general benchmark for secondary drying. Faster ramps risk pushing product temperature above its glass transition point, which causes the collapse that shows up as shrinkage in the finished batch.
How Much Headspace Should Freeze-Dried Candy Packaging Have?
Most freeze-dried candy pouches should carry 20 to 25% headspace above the product’s dried volume, based on industry sizing guidance. Sizing to wet weight instead of dried volume is one of the most common packaging mistakes that leads to crushed-looking bags.
Can Outsourcing to a Co-Packer Reduce Shrinkage?
Yes, especially for brands without dedicated freeze-drying equipment or packaging line synchronization. Space-man’s co-packing and private label services combine commercial freeze-drying with fast-fill pouch packaging under one process, closing the gap where most reabsorption-driven shrinkage happens.
What’s the Biggest Mistake That Causes Shrinkage?
Rushing secondary drying by raising shelf heat to cut cycle time is the most common cause. It forces product past its glass transition threshold, collapsing the pore structure that a slower, controlled ramp would have preserved.