

Every Canadian home cook knows how frustrating it is to watch fresh vegetables go limp in the crisper before you get the chance to enjoy them. When you invest time in preparing produce at its peak, you can enjoy nutrient-packed snacks and convenient meal add-ins any time. By mastering each key stage from selection to storage, you’ll discover how tender, healthy vegetables become long-lasting, delicious staples right in your own pantry.
Table of Contents
- Step 1: Select And Prepare Fresh Vegetables
- Step 2: Arrange Vegetables For Optimal Freeze Drying
- Step 3: Operate Home Freeze Dryer Safely
- Step 4: Check Dryness And Quality Of Vegetables
- Step 5: Store Freeze Dried Veggies Effectively
Quick Summary
| Key Point | Explanation |
|---|---|
| 1. Choose Fresh, Quality Vegetables | Select vegetables that are firm, vibrant, and free from blemishes for optimal freeze-drying. |
| 2. Cut Uniformly for Consistent Drying | Cut vegetables into uniform sizes to ensure they freeze-dry evenly and completely. |
| 3. Arrange for Good Airflow | Lay pieces in a single layer on trays to maximize airflow and moisture removal during freeze-drying. |
| 4. Verify Dryness Before Storing | Check that vegetables feel brittle and show no visible moisture to prevent spoilage. |
| 5. Store in Airtight Containers | Use airtight jars or vacuum-sealed bags to protect freeze-dried vegetables from moisture. |
Step 1: Select and Prepare Fresh Vegetables
This is where everything starts. The quality of your freeze-dried vegetables depends almost entirely on what you pick at the store and how you prepare them. You’re looking for produce that’s at its peak, not vegetables that are past their prime or showing signs of damage. The better your starting material, the better your finished snack will be.
Start by selecting vegetables that are tender, firm, and free from bruises or soft spots. Think about choosing vegetables at their harvest peak, when they’re freshest. Broccoli should be vibrant green with tight florets, carrots should snap when you bend them, and peppers should feel heavy for their size. Avoid anything that looks wilted, discolored, or has blemishes. You want vegetables that would make you excited to eat them fresh because that same quality translates directly to your freeze-dried results. Once you get home, wash everything thoroughly under cool running water to remove dirt and any surface contaminants. Selecting tender, healthy vegetables and cleaning them properly prevents spoilage and helps retain nutritional value.
Now comes the prep work. Remove any stems, damaged leaves, or outer layers that don’t look appetizing. For leafy greens, strip the leaves from woody stems. Cut your vegetables into uniform, bite-sized pieces, roughly 1/4 to 1/2 inch depending on what you’re working with. This consistency matters because it ensures everything freeze-dries at the same rate. You don’t want some pieces done while others are still processing. Depending on the vegetable, you may want to blanch certain items like green beans, peas, or broccoli in boiling water for a minute or two before freeze-drying to preserve their color and texture. Blanching times vary by vegetable type, so check what works best for your selection. Pat everything dry with clean towels or paper towels afterward, as excess moisture can affect freeze-drying efficiency.
Here is a quick comparison of common vegetable preparation methods and how they affect freeze-drying results:
| Method | Impact on Texture | Effect on Color | Best for |
|---|---|---|---|
| Raw/Unblanched | Crisp or tough | Some color loss | Peppers, carrots |
| Quick Blanching | Retains firmness | Color preserved | Broccoli, peas |
| Overblanching | Soft or mushy | Dulling | Avoid for all |
| Thick Slices | Uneven drying | Patchy color | Large vegetables |
Pro tip Cut your vegetables slightly smaller than you think you need them to be, since they shrink during freeze-drying and you want finished pieces large enough to grab and snack on, not dust-sized bits.
Step 2: Arrange Vegetables for Optimal Freeze Drying
How you arrange your vegetables on the freeze-drying trays makes a real difference in your results. This step is about setting yourself up for success by maximizing air circulation and ensuring even moisture removal. Done right, you’ll get perfectly freeze-dried pieces with great texture. Done carelessly, you might end up with some pieces ready while others are still damp.
Start by laying out your prepared vegetable pieces in a single layer on your freeze-drying trays. This is crucial because every piece needs exposure to air flow and the freeze-drying process. Pack them close enough that they don’t roll around, but not so tightly that they’re touching or stacked. Think of it like arranging books on a shelf where each one needs a little breathing room. Spreading pieces evenly on drying trays ensures good air circulation and effective moisture removal. If you’re using stainless steel or food-grade plastic trays, make sure they’re clean and dry before you start. Wet trays will introduce unwanted moisture and affect your freeze-drying time. For vegetables like mushrooms or tomatoes that release liquid during processing, you might want to line your tray with parchment paper to catch any drips and keep cleanup easier.
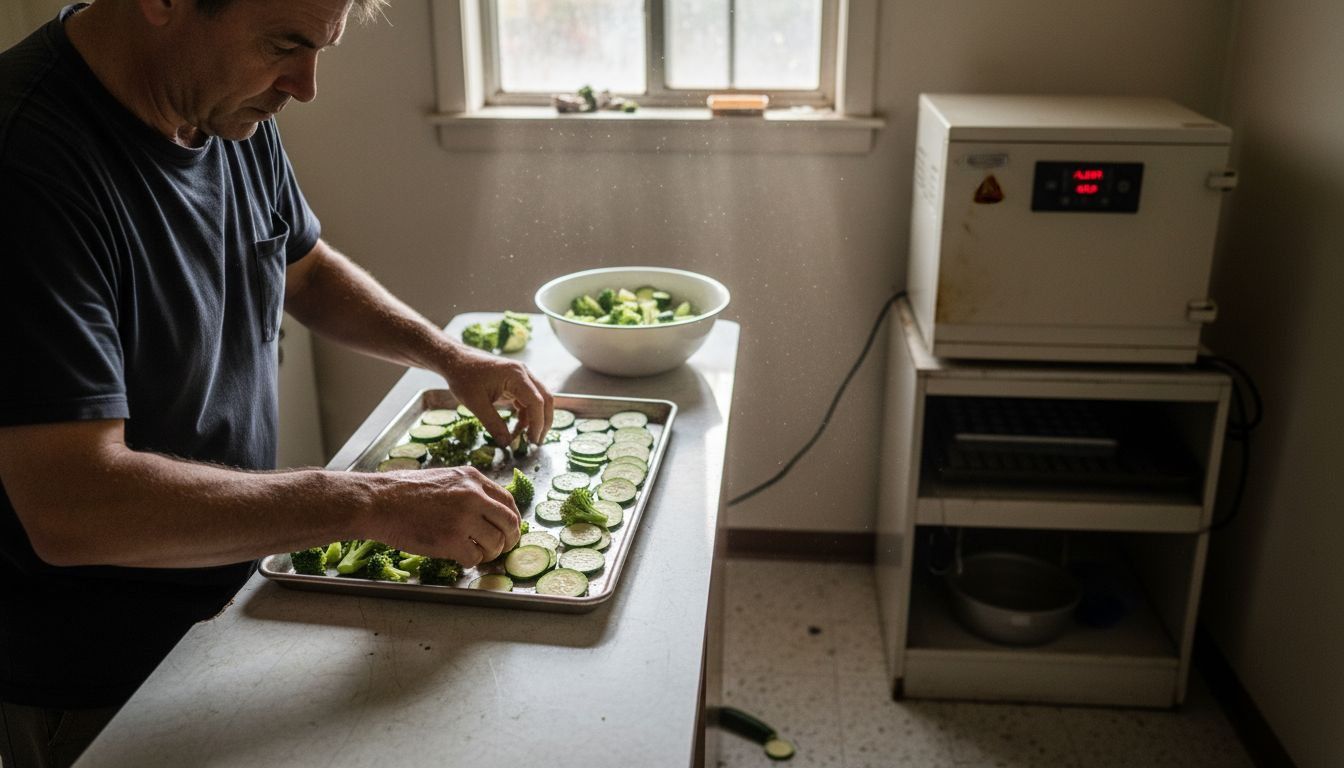
Consistency in piece size is also part of this arrangement step. When you cut everything uniformly back in step one, you made this job easier because now everything will freeze-dry at roughly the same rate. Ensuring uniform drying means fewer pieces that are overdone or underdone when your machine finishes its cycle. Take a moment to look at your arranged tray before it goes into the freeze-dryer. You want to see the tray surface with vegetables scattered across it, not piled up. This visual check takes 30 seconds and prevents a lot of disappointment later.
Pro tip Invest in perforated trays specifically designed for freeze-drying rather than solid ones, as they dramatically improve air circulation underneath your vegetables and reduce drying time by 15 to 20 percent.
Step 3: Operate Home Freeze Dryer Safely
Now that your vegetables are loaded, it’s time to run your freeze dryer with safety as your top priority. Operating these machines correctly ensures you get quality results while protecting yourself and your equipment. Think of this step as the bridge between preparation and enjoying your finished product, and doing it right matters.
Start by familiarizing yourself with your specific machine’s controls before you turn anything on. Read your equipment manual thoroughly, paying special attention to where the power switch, vacuum gauge, and temperature controls are located. Load your prepared trays into the freeze dryer chamber according to your manufacturer’s instructions, ensuring they sit flat and stable. Close the chamber door securely but don’t force it. Next, set your machine to its initial freezing phase, which typically runs between 24 to 36 hours depending on the vegetable load and your equipment model. During this stage, your vegetables are being frozen to the core, which is critical for the sublimation process that follows. Understanding freeze drying process stages including freezing and primary sublimation drying helps you monitor your machine effectively and catch any issues early. Keep the freeze dryer in a cool, well-ventilated space away from direct sunlight and heat sources.
Once the freezing phase completes, your machine automatically transitions to the primary drying phase, where water sublimates directly from the frozen vegetables. Check your vacuum seal and pressure readings regularly during this period, which typically lasts 12 to 24 hours. Never open the chamber door during active drying, as this compromises the vacuum and ruins your batch. Your machine will alert you when it moves into secondary drying, the final phase that removes any remaining moisture. When the complete cycle finishes, allow the chamber to return to room temperature before opening it. This prevents moisture from reabsorbing into your perfectly dried vegetables. Once cooled, remove your trays carefully and transfer your freeze-dried vegetables to airtight containers immediately.
Pro tip Keep a log of each freeze dry cycle, noting what you dried, how long it took, and any adjustments you made, so you can optimize future batches and troubleshoot quickly if something doesn’t go as planned.
Step 4: Check Dryness and Quality of Vegetables
Your freeze dryer has finished its cycle, but the work isn’t done yet. Before you celebrate, you need to confirm that your vegetables are actually dry enough to store safely. This quality check takes just a few minutes and makes the difference between vegetables that last for months and ones that spoil in weeks.
Start by letting your trays cool completely to room temperature. Once cooled, pick up a few pieces from different areas of the tray and perform a simple tactile test. The vegetables should feel brittle or at least quite tough, never soft or squishy. Break a piece in half. If it snaps cleanly and doesn’t bend, you’re in good shape. If it bends or feels leathery, it needs more drying time. Some vegetables like mushrooms or zucchini naturally feel a bit tougher than broccoli or carrots, so you’ll develop a feel for what’s right as you do more batches. Look for any visible moisture on the surface or inside the broken pieces. You shouldn’t see any droplets or damp spots. This is critical because testing for dryness prevents moisture that causes spoilage and keeps your vegetables shelf stable. Sample pieces from at least three different areas of each tray, not just the edges, because moisture distribution isn’t always even.
If you find pieces that aren’t quite dry enough, don’t worry. You can run your freeze dryer for an additional 4 to 8 hours on a secondary drying cycle to remove that remaining moisture. Once you’re confident everything is properly dried, inspect for color and overall appearance. Your vegetables should retain their natural color without browning or discoloration, which would indicate over processing or contamination. Check for any visible mold, off odors, or unusual textures. Quality freeze-dried vegetables look crispy and appetizing, not dull or damaged. Transfer your finished pieces into airtight containers or vacuum-sealed bags immediately after confirming they’re dry. Any exposure to ambient humidity will start rehydrating them, undoing all your careful work.
Pro tip Place a small silica gel packet in each storage container to absorb any residual moisture and extend shelf life to 12 to 18 months, especially important if you live in a humid Canadian climate.
Step 5: Store Freeze Dried Veggies Effectively
You’ve done the hard work, and now your freeze-dried vegetables are ready for storage. How you package and store them determines whether they stay crispy and nutritious for months or start absorbing moisture and degrading within weeks. Think of this step as protecting your investment of time and effort.
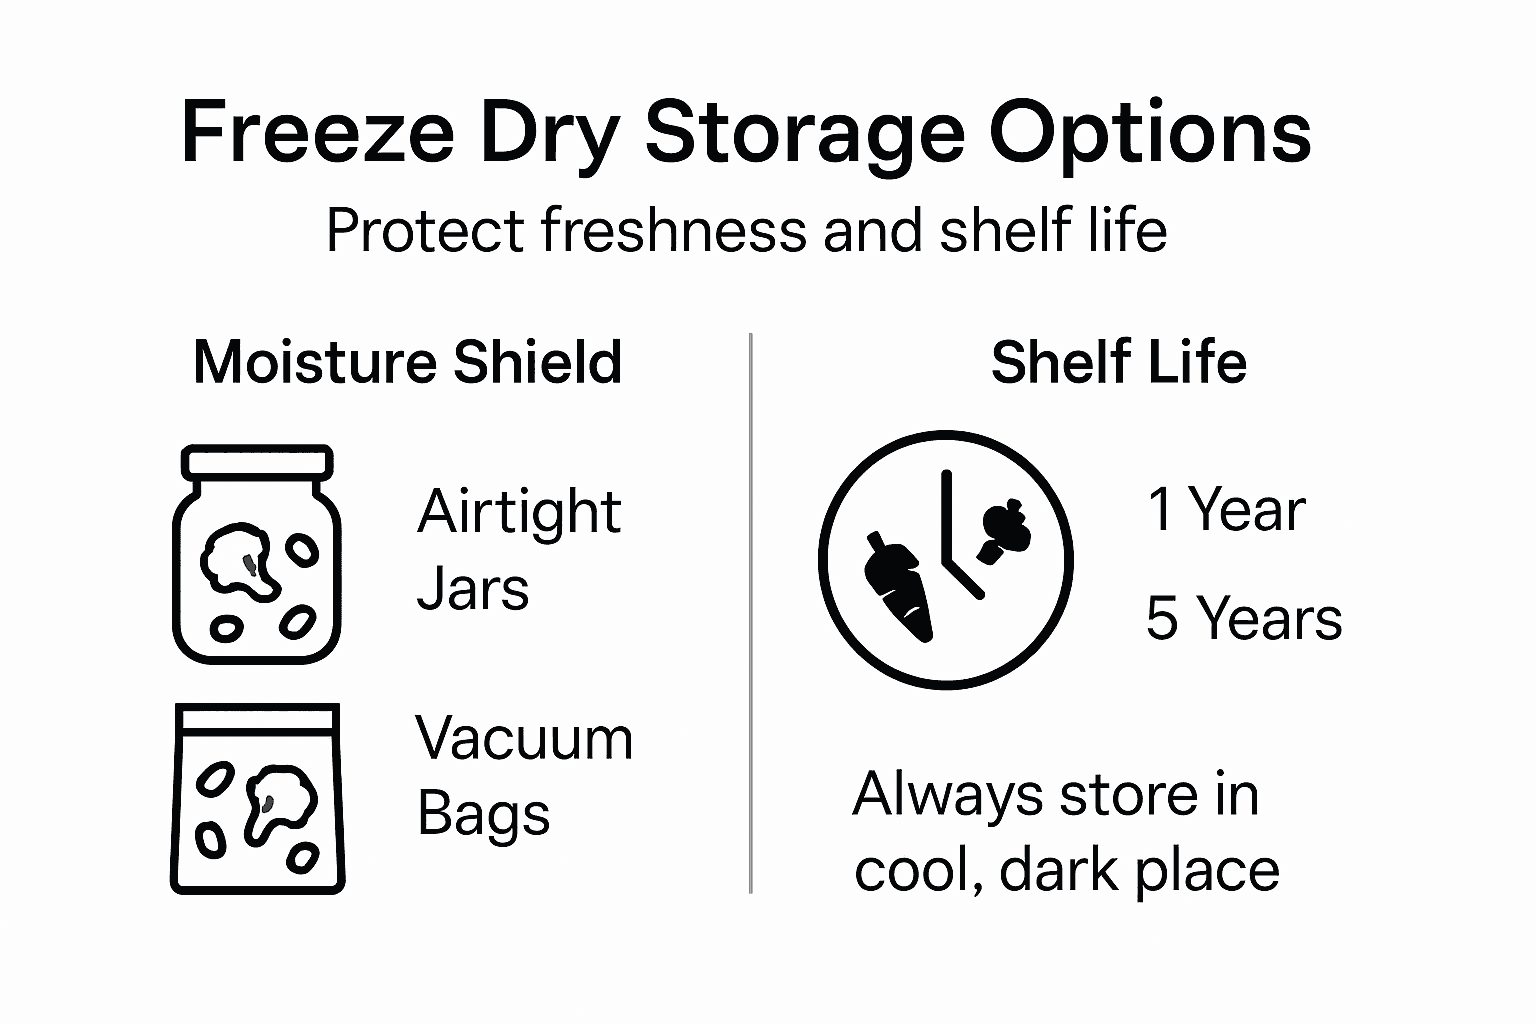
Start by selecting the right storage containers. Airtight glass jars with rubber gaskets work wonderfully, as do vacuum-sealed bags designed for food storage. The key is creating a moisture-proof barrier that prevents humidity from sneaking back in. Your freeze-dried vegetables have had almost all their water removed, making them incredibly lightweight and shelf stable, but they’re also moisture magnets if exposed to humid air. Place your cooled vegetables directly into your chosen containers and seal them immediately. Don’t wait. That brief window between cooling and sealing is when moisture can start reabsorbing. Freeze-dried foods remain shelf stable when packaged in hermetically sealed containers that prevent moisture reabsorption. If you’re using glass jars, consider adding silica gel packets inside to absorb any residual moisture. These packets are inexpensive and extend shelf life significantly, especially useful for those of us living in humid Canadian climates where indoor moisture can be persistent.
Now find the right place to store your containers. Pick a cool, dry, dark location. A pantry away from direct sunlight works great. Avoid areas near heat sources like ovens or sunny windows, which can warm your vegetables and encourage moisture movement. The basement or a cool closet also works well if it stays dry. Don’t store them in the refrigerator or freezer, despite the instinct to do so. Cold temperatures don’t help, and condensation from temperature changes can introduce unwanted moisture. Label your containers with the vegetable type and the date you freeze-dried them. This simple habit helps you rotate stock and know what you’re grabbing when you need a snack. Properly stored freeze-dried vegetables will stay fresh and crispy for 12 to 18 months, sometimes longer. When you’re ready to use them, open the container, grab what you need, and reseal it immediately. The longer your containers stay open, the more ambient moisture gets inside.
The following table summarizes optimal storage options for maintaining freeze-dried vegetable freshness:
| Storage Method | Moisture Protection | Ideal Shelf Life |
|---|---|---|
| Vacuum-sealed bags | Excellent | 12-18 months |
| Airtight glass jars | Very good | 12-18 months |
| Regular zip bags | Poor | 2-4 weeks |
| Open containers | None | 1-2 days |
Pro tip Divide your freeze-dried vegetables into smaller portion-sized containers instead of one large one, so you minimize the air exposure each time you open a container and extend the shelf life of your entire supply.
Elevate Your Freeze-Dried Vegetable Experience with Expert Packaging Solutions
Successfully freeze drying vegetables at home demands attention to detail from selecting fresh produce to storing your final product in airtight containers. If you have faced challenges like uneven drying, moisture reabsorption, or limited shelf life despite following all the right steps, you are not alone. These pain points highlight the critical need for professional-grade packaging and packaging techniques to preserve freshness and texture for months.

Discover how partnering with a trusted Canadian freeze dried candy manufacturer can solve these frustrations. At Space-Man, we specialize in advanced bagging and packaging services designed to lock in crispness and extend shelf life. Whether you want to elevate your home freeze-dried veggies to commercial quality or explore private labeling and co-packing options, our expertise turns your freeze-dried products into irresistible snacks loved by consumers. Take control of your storage challenges today with our proven solutions and enjoy perfect freeze-dried vegetables every time. Visit Space-Man to get started on maximizing freshness and convenience now.
Frequently Asked Questions
What vegetables are best for freeze drying at home?
The best vegetables for freeze drying are those that are firm and fresh, such as broccoli, carrots, and peppers. Choose vegetables that are free from bruises and appear vibrant; ideally, they should be at their peak freshness.
How do I prepare vegetables for freeze drying?
Prepare your vegetables by washing them thoroughly, cutting them into uniform pieces, and removing any undesirable parts like stems or damaged leaves. For some vegetables, consider blanching them briefly to preserve color and texture before freeze drying.
How should I arrange vegetables on the freeze drying trays?
Lay your prepared vegetable pieces in a single layer on the freeze drying trays, ensuring they are not touching or stacked. This allows for optimal air circulation, promoting even moisture removal during the process.
How can I check if my freeze dried vegetables are done?
After the freeze drying cycle, check for dryness by breaking a piece in half; it should snap cleanly without feeling soft. If any pieces bend or feel leathery, run the freeze dryer for an additional 4 to 8 hours.
What is the best way to store freeze dried vegetables?
Store your freeze dried vegetables in airtight containers, such as glass jars with rubber gaskets or vacuum-sealed bags, to prevent moisture reabsorption. Keep these containers in a cool, dry, and dark place to maintain freshness for 12 to 18 months.
How can I extend the shelf life of freeze dried vegetables?
To extend shelf life, consider adding silica gel packets to your storage containers to absorb any residual moisture. Additionally, divide your freeze dried vegetables into smaller portion-sized containers to minimize air exposure each time you open one.